
More thoughts from Episode 62: Dear Dairi…
I have a bit more to say about Episode 62 today, because it’s just an eventful chapter! From the perspective of most of the characters experiencing it all, the biggest event is the arson attack on the palace, where they all live and/or work. And understandably, during the evacuation, there are many references to specific different parts of the palace and its surrounds. So let’s get into some more detail about the palace as it appears in Torikae baya.
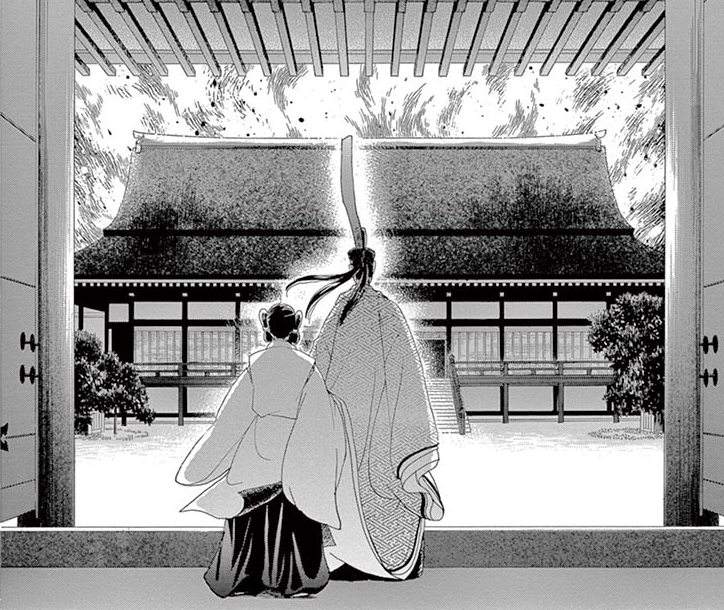
The Emperor and an attendant watch as the fire approaches the Shishinden.
Panel from volume 13, page 56. ©Chiho Saito/Shogakukan
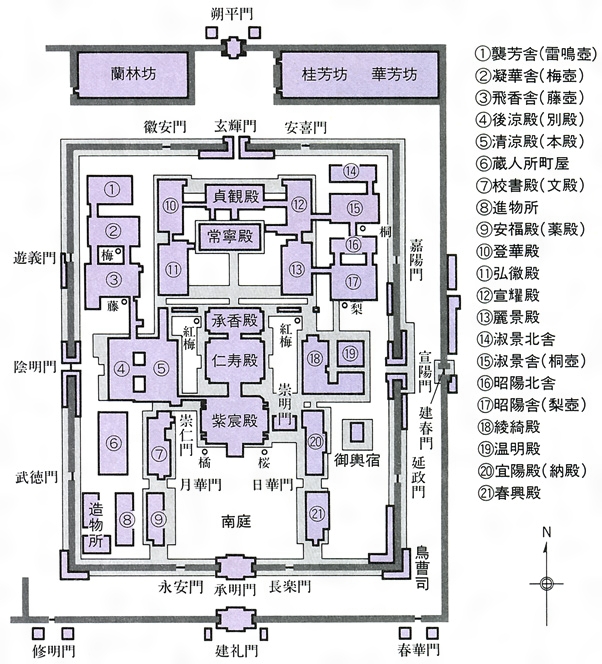
In the “Atogaki baya” section at the end of volume 11, Saito provides her own plans for the palace from big to small: a vague map of Heian-kyo, then plans of the greater palace (daidairi, 大内裏), the inner palace (dairi, 内裏) and the Emperor’s quarters (Seiryoden, 清涼殿). Today, I’m mainly interested in the dairi and its immediate surroundings. Saito points out that the historical palace was moved more than 15 times due to fire – in hindsight, maybe a hint at what is to come in the final volume – and offers this as a reason for her version not to quite align with the real palace at any particular point in time, but the plan itself is pretty much the same as this one from Encyclopedia Nipponica.
The names of various buildings are given in the plan, and several are noted as where certain characters’ rooms are. In real life, some of these buildings have been recreated at the present-day Kyoto Imperial Palace, which is located to the east of the historical palace, and these recreations are clearly the reference points for the manga versions. Buildings are connected to each other by walkways, and they have nothing but blinds to keep people from seeing inside.
I paid particular attention in the previous post to the Daigokuden, a building that plays an important role for the third time, having previously been the setting for Sara’s attempt to fight his “curse” during the eclipse and later, the cunning plan to improve Togu’s reputation when the Amatsukitsune appears. There is no Daigokuden at today’s Kyoto Imperial Palace, but the version in Torikae baya, with its upper gallery section, appears to be based on the Daigokuden at the reconstructed previous capital of Heijo-kyo in Nara.
But several more locations are mentioned in Episode 62 as well! The fire begins in the Shokyoden, roughly in the middle of the dairi, which is where Sara currently stays. Sara (in Suiren’s clothes) delivers the news to the Emperor in the Seiryoden, then sticks around to direct people to get all valuables out to a carriage waiting at the Onmeimon, the nearest of multiple gates. We hear that a walkway is torn down to stop the fire reaching the Seiryoden, but it spreads southward to the Jijuden and the Shishinden, a venue for major court ceremonies. By the time we see the view from the top of the Daigokuden, just southwest of the dairi, it appears that many of those central buildings are in flames.
Meanwhile, Suiren covers quite a bit of ground. She goes with San no Hime to see Yoshino no Miya in the Shingon’in, one of the few Buddhist temples permitted within the city at that time, located to the west of the dairi. After sending San no Hime and Yoshino away to safety, Suiren is seen advising people to escape through the Taikenmon, one of the eastern gates, and avoid the trouble brewing to the south. When she next appears, she’s spotting the Emperor narrowly avoiding an attack near the Daigokuden. This all probably means that Suiren either leaves the Shingon’in, goes directly east, then backtracks west, or that she does a loop around the outside of the dairi.
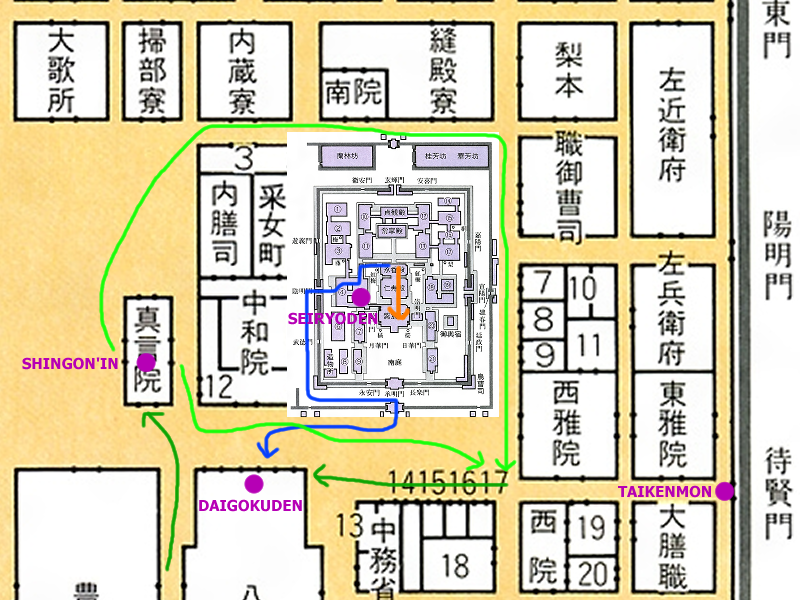
Here’s a dodgy map of where I think Sara and Suiren go in Episode 62:
Edited map of the dairi and surrounding area, based on Encyclopedia Nipponica maps. The path of the fire is indicated in orange. Sara’s likely route is indicated in blue. Suiren’s likely route is indicated in green (light green is used for the two alternatives after leaving the Shingon’in).
Now, that’s a lot of places getting specific mentions – and that’s just in this chapter! Throughout the series, we get to know some of these buildings quite well, and having the plan of the palace helps make sense of how they’re all connected. The Seiryoden and Shishinden of course play a big part, but other notable parts of the palace include the Nashitsubo (also called the Shoyosha) where Togu lives and her servants work from volumes 2 to 11, the Sen’yoden where Suiren resides during her time as naishi no kami, and the Shigeihokusha where Shikibu-kyo no Miya has his quarters and Sara and Tsuwabuki’s fateful encounter occurs. There are also the Umetsubo and Reikeiden, pavilions that give their names to their notable residents, wives of the current and former Emperors respectively; the Emperor’s other ladies briefly identified in Episode 58 are named for palace buildings too.
But after getting used to the palace, we must now say goodbye to it for the time being! At the end of this chapter, the Emperor leaves the ruined palace behind, and Marumitsu offers his own home as a temporary palace (satodairi, 里内裏). Unfortunately, I haven’t yet figured out where Marumitsu’s residence is – if it even is meant to be in a particular location – but moving to a satodairi wasn’t an uncommon practice, so I haven’t ruled out the possibility that it might correspond to a historical example. Anyway, that’s where the action will take place until the main palace is rebuilt!
Finally, I’ll note that although there are some reconstructed buildings at the Kyoto Imperial Palace, none of the very flammable originals remain today. However, there are a few plaques dotted around to commemorate their original locations, and I’ve done my best to include those on my interactive map. That map, by the way, is now up to date, and probably won’t have anything else added to it unless I make a breakthrough in identifying some other locations. Please give it a look if you’re curious about the relative positions of the places that show up in Torikae baya!